%EB%A1%9C%20%EA%B5%AC%EC%84%B1%EB%90%9C%20%EA%B7%B8%EB%A6%AC%EB%93%9C%EC%97%90%20%EC%9D%B4%EB%AF%B8%EC%A7%80%EB%A5%BC%20%ED%91%9C%EC%8B%9C%ED%95%98%EB%8A%94%20%EB%B0%A9%EB%B2%95%EC%9D%80%20%EB%AC%B4%EC%97%87%EC%9E%85%EB%8B%88%EA%B9%8C%3F.png)
약 30개의 이미지가 있습니다(모든 이미지의 크기는 300x75로 동일합니다.)를 디렉터리에 저장하고 크기의 그리드에 렌더링하려고 합니다.5x6.
지금까지는 수동으로 수행했습니다.
$ feh -i --thumb-width 300 --thumb-height 75 --limit-width 300*5 --limit-height 75*6 . &
이 작업을 수행하는 기본 제공 옵션이 있습니까? 이 같은:
$ feh -i --num-rows 5 --num-columns 6 .
이것은 더 깨끗해 보이고 피하고 싶습니다.
- 원본 이미지 크기 설명 엄지손가락 너비그리고엄지손가락 높이따라서 인덱스 모드에서는아니요원본 크기로 크기를 조정합니다.
- 수동 계산제한 폭그리고높이 제한따라서 모든 이미지가 렌더링됩니다.
답변1
이 문제를 조사하는 동안 작동하는 것으로 보이는 것을 찾지 못했습니다 feh. 몽타주 스위치가 가장 가깝지만 동적 크기 조정을 허용하지 않고 및 스위치를 기반으로 한 몽타주만 표시 -H합니다 -W.
이를 감안할 때 가장 좋은 접근 방식은 다음과 같습니다.
$ cat fehm.bash
#!/bin/bash

 gridW=5
 gridH=6

 file=(*.jpg)
 W=$(identify -ping -format '%w' $file)
 H=$(identify -ping -format '%h' $file)
 LW=$(($W * $gridW))
 LH=$(($H * ($gridH + 1)))
 feh -i --index-info '' --thumb-width $W --thumb-height $H \
   --limit-width $LW --limit-height $LH .


 #    --index-info format
 #             Show image information based on format below thumbnails in
 #             index / thumbnail mode.  See FORMAT SPECIFIERS.  May contain
 #             newlines. Use "--index-info ''" to display thumbnails without
 #             any info text
 #
 #             Note: If you specify image-related formats (such as %w or
 #             %s), feh needs to load all images to calculate the dimensions
 #             of its own window.  So when using them with many files, it
 #             will take a while before a feh window becomes visible. Use
 #             --preload to get a progress bar.
 #
 #   -i, --index
 #             Enable Index mode.  Index mode is similar to montage mode,
 #             and accepts the same options.  It creates an index print of
 #             thumbnails, printing the image name beneath each thumbnail.
 #             Index mode enables certain other options, see INDEX AND
 #             THUMBNAIL MODE OPTIONS and MONTAGE MODE OPTIONS.
 #
 #   -H, --limit-height pixels
 #             Limit the height of the montage.
 #
 #   -W, --limit-width pixels
 #             Limit the width of the montage, defaults to 800 pixels.
 #
 #             If both --limit-width and --limit-height are specified, the
 #             montage will be exactly width x height pixels in dimensions.
 #
 #   -E, --thumb-height pixels
 #             Set thumbnail height.
 #
 #   -y, --thumb-width pixels
 #             Set thumbnail width.
스크립트를 사용하지 않으려면 위의 내용을 Bash 함수에 통합할 수 있습니다.
$ cat fehm_func.bash
fehm () {
 gridW=5
 gridH=6

 file=(*.jpg)
 W=$(identify -ping -format '%w' $file)
 H=$(identify -ping -format '%h' $file)
 LW=$(($W * $gridW))
 LH=$(($H * ($gridH + 1)))
 feh -i --index-info '' --thumb-width $W --thumb-height $H \
   --limit-width $LW --limit-height $LH .
}
위의 내용을 다음과 같이 얻으면 됩니다.
$ . fehm_func.bash
$ fehm
개정하다
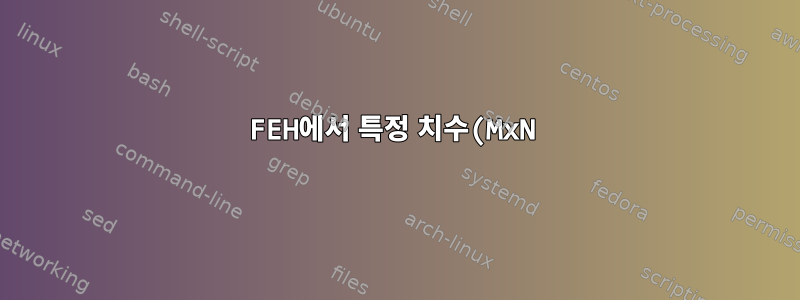
이 작업을 수행하는 동안 제가 알아차린 한 가지는 초기 예제가 작동하지 않는 것 같다는 것입니다. 그리드를 5x6으로 설정하면 5x5만 생성됩니다. 이는 이미지 라인 사이의 공간으로 인해 발생하는 것으로 보입니다. 이 문제를 해결하기 위해 $gridH계산에 1을 추가하여 효과적으로 5x7로 만들었습니다.
LH=$(($H * ($gridH + 1)))
예제 실행
위에서 언급한 장소와 함께. 다음 스크립트를 사용하여 일부 샘플 데이터를 작성합니다. 데이터는 귀하의 것과 동일한 크기(300x75)의 이미지로 구성되며, 제가 제공한 솔루션의 효과를 확인하는 데 도움이 되도록 파란색과 빨간색이 번갈아 표시됩니다.
$ for i in {01..30};do int=$(expr $i); [ $((int%2)) -eq 0 ] && c=blue || \
   c=red; convert -size 300x75 xc:${c} img${i}.jpg;done
이 파일 세트의 결과:
$ ls | column -c 80
img01.jpg   img07.jpg   img13.jpg   img19.jpg   img25.jpg
img02.jpg   img08.jpg   img14.jpg   img20.jpg   img26.jpg
img03.jpg   img09.jpg   img15.jpg   img21.jpg   img27.jpg
img04.jpg   img10.jpg   img16.jpg   img22.jpg   img28.jpg
img05.jpg   img11.jpg   img17.jpg   img23.jpg   img29.jpg
img06.jpg   img12.jpg   img18.jpg   img24.jpg   img30.jpg
위의 데이터를 사용하여 이제 함수를 사용하면 다음과 같습니다 fehm.
$ fehm